KEDA’s dynamic scheduling fixes Kubernetes long-running workloads
January 17, 2024
Introduction
When people talk about autoscaling, most of the time it is about scaling up, but have you asked yourself, what is the impact of scaling on different types of applications?
Let’s say you have written an API or a Job that takes a significant amount of time to get the work done and this application is configured with autoscaling in Kubernetes.
Scaling up is effortless, no problems there. But when Kubernetes instructs to scale in the application, what happens to the long-running process inside the container? If it gets killed, what about the inefficiency (processing cycles wasted) introduced with the enablement of auto-scaling?
These are some inherent problems of autoscaling that KEDA solves. In this blog post, we will show how KEDA not only enables event-driven autoscaling but also handles the intricacies associated with autoscaling.
Pre Requisites
- Kubernetes Cluster: We will deploy KEDA & Kafka in a Kubernetes cluster. We will be using an EKS cluster, but any cluster will suffice.
- Kubectl and Helm CLI: Installed on your local machine.
The Issue with Traditional Autoscaling
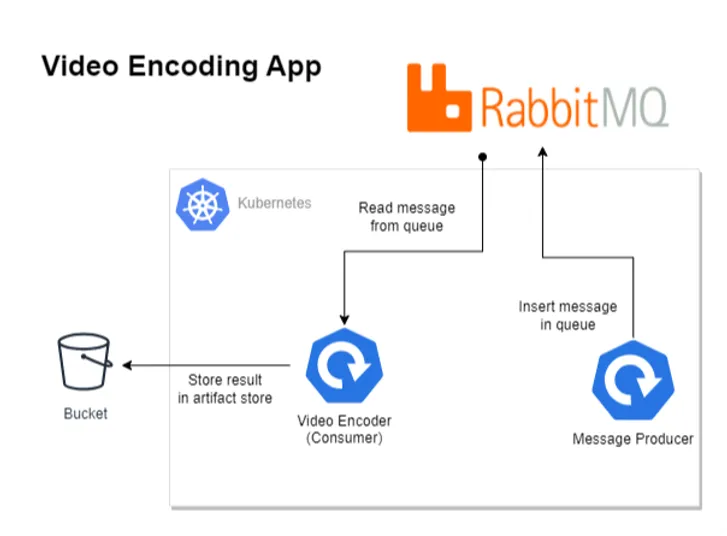
Diagram of Video Encoding Application
Imagine a video streaming application like Netflix where each video has to be encoded into multiple formats: 480p, 720p, 1080p, 4K, etc. The encoding process is time-consuming and takes between 1 to 3 hours, depending on the requested quality. This video data, along with quality specifications, is available as a message in RabbitMQ.
A simple workflow for an application that encodes videos from RabbitMQ would be:
- Read the message from the queue.
- Encode the video as per specification.
- Store the result and process the next message.
However, this naive implementation has scaling limitations as it processes only one message at a time. Here are some possible improvements:
- Introduce Concurrent Processing: One can modify the application to process multiple messages concurrently, but with a single replica, this will eventually hit node resource limits, and you need to scale vertically.
- Fixed Number of Kubernetes Replicas: One can start the application with a fixed number of replicas, regardless of the application execution type (synchronous or concurrent). It will face scaling issues when a large number of messages are produced.
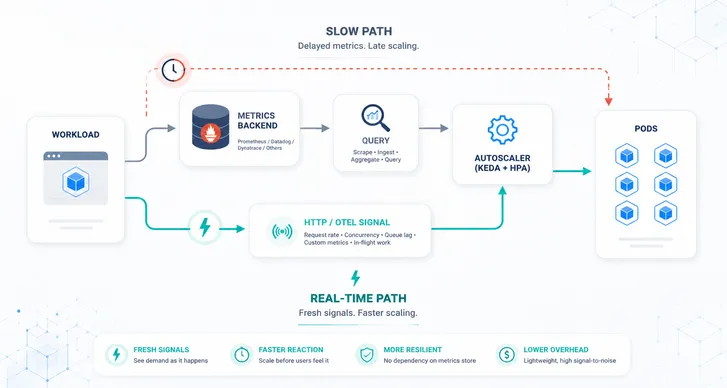
- Using Kubernetes HPA One can configure Kubernetes HPA to scale based on the CPU and RAM utilization of the application. But as discussed in our previous post, this is ineffective in the modern cloud era.
Autoscaling Based on Queue Size
A more effective metric for scaling would be RabbitMQ queue size, i.e., creating pod replicas based on the queue’s length. But Kubernetes can scale only based on CPU and memory usage.
This is where KEDA comes in. KEDA addresses this limitation by enabling scaling based on various external events, one of which is RabbitMQ queue size. Now you can simplify your application to process only one message at a time and offload scaling decisions to KEDA.
To get started, KEDA provides a ScaledObject![]() CRD that enables event-driven autoscaling of Kubernetes workloads. Refer to this blog post to learn more about it.
CRD that enables event-driven autoscaling of Kubernetes workloads. Refer to this blog post to learn more about it.
As discussed earlier, there are some inherent problems with autoscaling, regardless of whether you are using KEDA or HPA.
The Problem with Long-running Processes: Suppose KEDA decides to scale out the pods owing to the large number of messages in RabbitMQ, but after a coolDownPeriod![]() , it determines that the load is below the configured threshold and decides to scale in (reduce the number of pods). This scale-in action will terminate the ongoing video processing, leading to inefficiency. Particularly in the case of RabbitMQ, if the application doesn’t send an acknowledgment that the message is processed, a new job will start processing the same message, rendering the previous processing time wasted. In the worst-case scenario, the message might be lost if it has already been acknowledged but not completely processed.
, it determines that the load is below the configured threshold and decides to scale in (reduce the number of pods). This scale-in action will terminate the ongoing video processing, leading to inefficiency. Particularly in the case of RabbitMQ, if the application doesn’t send an acknowledgment that the message is processed, a new job will start processing the same message, rendering the previous processing time wasted. In the worst-case scenario, the message might be lost if it has already been acknowledged but not completely processed.
Here are some workarounds for the above problem.
- Adjusting the coolDownPeriod: Increasing the coolDownPeriod can provide a buffer to allow long-running processes to complete before the autoscaler decides to scale down. This period is the time after the last trigger was fired that KEDA waits before scaling down. By setting a longer coolDownPeriod, you give your application more time to process messages even when the queue size has dropped below the threshold. However, it’s a delicate balance: setting it too long might lead to underutilization of resources, while setting it too short might not give enough time for processes to complete.
- Shutting Down Application Gracefully: When Kubernetes sends a SIGTERM signal, the application should ideally start a graceful shutdown process. This process can include completing the current task, refusing new tasks, and ensuring that the current state is saved properly. The terminationGracePeriodSeconds
 in the Kubernetes pod configuration specifies how long to wait after SIGTERM before sending SIGKILL. Setting an appropriate terminationGracePeriodSeconds gives your application enough time to shut down gracefully. This period should be long enough to handle the longest expected processing time for a message.
The above solutions are just workarounds, because timing any configuration for autoscaling might lead to unknown errors. This ineffectiveness of processing long-running jobs with autoscaling is precisely where the concept of Scaled Jobs becomes critical.
Introducing Scaled Jobs
The scaling problems of long-running processes can be solved by just letting them run until completion and not interrupting them. This is exactly what a Kubernetes Job![]() does.
does.
ScaledJob![]() is a KEDA CRD designed to manage the autoscaling of Kubernetes jobs. It is an extension of Kubernetes Jobs
functionality. Kubernetes Jobs are designed to run individual or batch processes that eventually complete on their own. However, they lack the capability to autoscale based on external metrics or
events.
is a KEDA CRD designed to manage the autoscaling of Kubernetes jobs. It is an extension of Kubernetes Jobs
functionality. Kubernetes Jobs are designed to run individual or batch processes that eventually complete on their own. However, they lack the capability to autoscale based on external metrics or
events.
KEDA enables this functionality by introducing event-driven scaling. This allows ScaledJobs to start additional Kubernetes jobs based on external triggers, such as the length of a queue. The scale-up behavior is the same as ScaledObject, but jobs created by ScaleJobs are not terminated until they are completed.
In our scenario, we can use ScaledJobs to monitor the RabbitMQ queue and dynamically deploy jobs to process each item. Once a job is completed, it’s terminated. Each job handles a portion of the workload, reducing the risk of wasted efforts due to mid-process termination in scaling-down scenarios.
Implementing Scaled Jobs: A Step-by-Step Guide
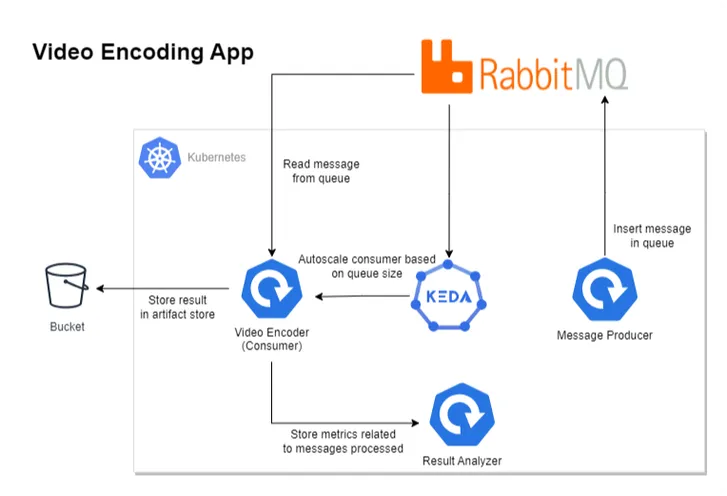
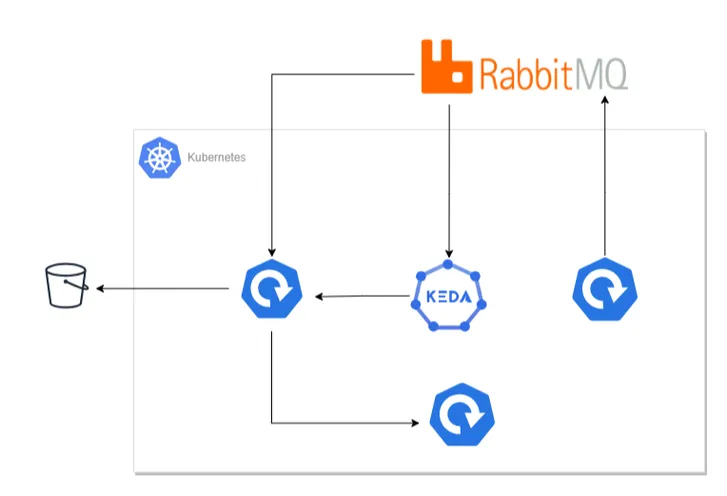
Diagram with Video Encoding Application using KEDA
The above diagram depicts our revised architecture for the video encoding application, which contains four components.
- Message Producer: Produces messages in RabbitMQ, containing video and encoding quality information.
- Video Encoder/Consumer: Reads the message from RabbitMQ, processes it, and stores the result in an artifact store like the S3 Bucket.
- KEDA: Handles the autoscaling of consumer application on the basis of RabbitMQ queue size.
- Result Analyzer: To understand the autoscaling behavior, this component exposes some REST APIs that are consumed by the Video Encoder application. It essentially keeps track of events that occurred while processing the message.
We will first demonstrate the inefficiency of autoscaling long-running processes with ScaledObjects and then use ScaledJobs to see how it solves the problem.
Solution with ScaledObjects
- Clone the Example Repository
git clone https://github.com/kedify/examples.gitcd examples/blogs/keda_scaled_job_for_long_running_workload2. Install RabbitMQ Kubernetes Operator
We will use RabbitMQ operator![]() to provision and manage our cluster.
to provision and manage our cluster.
kubectl apply -f "https://github.com/rabbitmq/cluster-operator/releases/latest/download/cluster-operator.yml"- Create RabbitMQ Cluster
kubectl apply -f rabbitmq_cluster.yamlWait for cluster to be up & running, It usually take 1 to 2 minutes.
- Accessing the RabbitMQ UI (Optional)
Execute the below command and open this URL ![]() on browser to access the RabbitMQ admin UI. Use the below admin credentials to login.
on browser to access the RabbitMQ admin UI. Use the below admin credentials to login.
kubectl port-forward "service/rabbitmq-cluster" 15672Username: default_user_hmGZFhdewq65P4dIdx7 Password: qc98n4iGD7MYXMBVFcIO2mtB5voDuV_n
- Install KEDA
helm repo add kedacore https://kedacore.github.io/chartshelm repo updatehelm install keda kedacore/keda --namespace keda --create-namespace- Deploy Video Encoder Application
This application is configured to read one message at a time from RabbitMQ and starts processing. As this is a demo application, instead of actually performing any encoding operation, it sleeps for a configurable duration (defaults to 6m). And after the elapsed time, it starts processing the next message.
kubectl apply -f cli-consumer-program/rabbitmq_consumer.yaml- Create Scaled Object
We have configured our scaled object to target consumer-program deployment and enabled auto-scaling based on the rabbitmq queue size. The value of queue size is set to 1. Refer to the docs, to learn more about RabbitMQ Scaler![]() .
Example: If one pod can handle 10 messages, set the queue length target to 10. If the actual number of messages in the queue is 30, the scaler scales to 3 pods.
.
Example: If one pod can handle 10 messages, set the queue length target to 10. If the actual number of messages in the queue is 30, the scaler scales to 3 pods.
apiVersion: keda.sh/v1alpha1kind: ScaledObjectmetadata: name: rabbitmq-scaledobject namespace: defaultspec: minReplicaCount: 1 pollingInterval: 10 scaleTargetRef: name: consumer-program triggers: - type: rabbitmq metadata: protocol: amqp queueName: testqueue mode: QueueLength value: "1" authenticationRef: name: keda-trigger-auth-rabbitmq-connExecute the below command to create the scaled object.
kubectl apply -f rabbitmq_scaled_object_amqp.yaml- Deploy Result Analyzer
kubectl apply -f result-analyzer-program/deployment.yaml- Create Producer Application Execute the below command to start producing messages, the below jobs produces 15 messages in a queue called testqueue
kubectl delete job producer-program --ignore-not-found=true && kubectl apply -f python-producer-program/rabbitmq_producer.yaml- Observing the Result Wait for 10–15 minutes for some messages to be processed, and then execute the below command. This curl request gets the auto-scaling event data from the result analyzer application.
kubectl exec $(kubectl get pods -l app=result-analyzer -o jsonpath='{.items[0].metadata.name}') -- curl http://localhost:8080/get/count -s | jqBelow is the response to the above curl request. The event with a message kill count indicates that the application was terminated while processing a message. Whereas an event with a message processed count indicated the message was processed successfully.
[ "2024-01-16 11:41:29 - kill count 1", "2024-01-16 11:41:29 - kill count 2", "2024-01-16 11:41:29 - kill count 3", "2024-01-16 11:41:30 - processed count 1", "2024-01-16 11:42:29 - kill count 4", "2024-01-16 11:42:29 - kill count 5", "2024-01-16 11:42:29 - kill count 6", "2024-01-16 11:42:29 - kill count 7", "2024-01-16 11:42:30 - processed count 2", "2024-01-16 11:42:30 - processed count 3", "2024-01-16 11:42:30 - processed count 4", "2024-01-16 11:43:29 - kill count 8", "2024-01-16 11:43:29 - kill count 9", "2024-01-16 11:43:30 - kill count 10", "2024-01-16 11:47:31 - processed count 5"]From the above response, we could conclude that out of 15 messages, only 5 were processed successfully, whereas the remaining 10 were terminated while processing due to scale-down action.
Let’s analyze, how ScaledJobs solve this problem
Solution with ScaledJobs
- Delete Resources Created in the Previous Step
kubectl delete -f rabbitmq_scaled_object_amqp.yaml && kubectl delete -f cli-consumer-program/rabbitmq_consumer.yaml && kubectl exec $(kubectl get pods -l app=result-analyzer -o jsonpath='{.items[0].metadata.name}') -- curl -X POST http://localhost:8080/reset- Create ScaledJob
apiVersion: keda.sh/v1alpha1kind: ScaledJobmetadata: name: rabbitmq-scaledjob namespace: defaultspec: jobTargetRef: template: spec: containers: - name: consumer-program image: ghcr.io/kedify/blog05-cli-consumer-program:latest command: ["/bin/bash"] args: ["/scripts/consumer-script.sh"] volumeMounts: - name: script-volume mountPath: /scripts env: - name: RABBITMQ_URL valueFrom: secretKeyRef: name: rabbitmq-credentials key: address volumes: - name: script-volume configMap: name: consumer-script-config restartPolicy: Never pollingInterval: 10 # How often KEDA will check the RabbitMQ queue successfulJobsHistoryLimit: 100 # Number of successful jobs to keep failedJobsHistoryLimit: 100 # Number of failed jobs to keep maxReplicaCount: 100 # Maximum number of jobs that KEDA can create scalingStrategy: strategy: "default" # Scaling strategy (default, custom, or accurate) triggers: - type: rabbitmq metadata: protocol: amqp queueName: testqueue mode: QueueLength value: "1" # Number of messages per job authenticationRef: name: keda-trigger-auth-rabbitmq-connThe ScaledJob configuration is defined as follows:
Job Target Reference: The jobTargetRef section specifies the template for the job that KEDA will scale. It uses the same container image and script (/scripts/consumer-script.sh) as defined in the initial consumer deployment, ensuring that the scaled jobs perform the same task as the original consumer pod.
Note: There was one change made in the script, instead of continuing to read the next message after processing. The new script exits the process. This behavior is required for applications running as jobs, otherwise the job will never be terminated.
Polling Interval: Set at 10 seconds, this determines how frequently KEDA checks the RabbitMQ queue for new messages.
Jobs History Limits: Both successful and failed jobs history limits are set to 100, providing visibility into the job’s performance while managing resource utilization.
Max Replica Count: Capped at 100, it defines the maximum number of concurrent jobs.
Triggers: The trigger is set on RabbitMQ queue length, with the queueName specified as testqueue. Each job is triggered for a single message (value: “1”), ensuring that each job processes one message at a time.
For detailed information on configuring ScaledJob in KEDA, refer to the official KEDA documentation![]() .
.
Execute the below command to create the scaled job.
kubectl apply -f rabbitmq_scaled_job_amqp.yaml- Create Producer Application
Execute the below command to start producing messages, the below jobs produces 15 messages in a queue called testqueue:
kubectl delete job producer-program --ignore-not-found=true && kubectl apply -f python-producer-program/rabbitmq_producer.yaml- Observing the Result As done earlier, wait for 10–15 minutes for some messages to be processed and execute the below command. This curl request gets the auto-scaling event data from the result analyzer application.
kubectl exec $(kubectl get pods -l app=result-analyzer -o jsonpath='{.items[0].metadata.name}') -- curl http://localhost:8080/get/count -s | jqFrom the below response, we could conclude that all 15 messages were processed successfully and none were terminated while processing due to scale-down action.
[ "2024-01-17 05:50:45 - processed count 1", "2024-01-17 05:50:45 - processed count 2", "2024-01-17 05:50:45 - processed count 3", "2024-01-17 05:50:45 - processed count 4", "2024-01-17 05:50:45 - processed count 5", "2024-01-17 05:50:45 - processed count 6", "2024-01-17 05:50:45 - processed count 7", "2024-01-17 05:50:45 - processed count 8", "2024-01-17 05:50:45 - processed count 9", "2024-01-17 05:50:46 - processed count 10", "2024-01-17 05:50:46 - processed count 11", "2024-01-17 05:50:46 - processed count 12", "2024-01-17 05:50:46 - processed count 13", "2024-01-17 05:50:46 - processed count 14", "2024-01-17 05:50:46 - processed count 15"]Conclusion
In conclusion, ScaledJobs in Kubernetes offer a robust solution for handling long-running workloads, effectively addressing the inefficiencies of wasted processing time and potential data loss associated with ScaledObjects during autoscaling. By ensuring that each job runs to completion without interruption from scaling-down actions, ScaledJobs provides a more reliable and efficient processing environment.
We encourage you to tailor these methods to your setup and share your findings. Your feedback and experiences are invaluable to our community’s learning.